
Recently, we automated the CI/CD deployment for TYPO3 and Symfony projects using Bitbucket Runners. While this works well in many cases, it can be tricky if your destination machine is behind a firewall with strict SSH access rules. Sometimes, it feels like you need to open your server to half the internet just to get Bitbucket Runners working!
Thankfully, Bitbucket provides a solution: self-hosted runners within your own infrastructure. Not only do they solve connectivity issues, but they can also help you save on subscription costs by using your own infrastructure.
Let’s walk through how to set them up.
Bitbucket offers three ways to install a runner:
- Linux in a Docker container
- Native Linux
- Native Windows
While native installations (options 2 and 3) might be necessary for specific use cases, they come with some notable limitations. In our case, the Docker container option is the most suitable choice.
Requirements
- A 64-Bit Linux instance with at least 8GB of RAM as a host for the runner. But more is better. 😉
We’ll set up 16GB and 4 virtual CPU cores VM - Docker v19.03 and above
- At least minimum 512MB memory allocation for the runner container.
Bitbucket recommends not using swap for runners. So, you’ll either need to disable swap on your system or set up a virtual machine without swap enabled.
Setup Docker
At this stage, we already have Rocky Linux 9 installed and set up. Now, let’s briefly cover the installation of Docker.
The Docker package available in the official Rocky Linux 9 repository is not the latest version. To ensure you get the most up-to-date version, it’s best to install Docker from the official Docker repository. Here’s how to do it.
First, update the package database and add the official Docker repository. While Docker doesn’t provide a Rocky Linux-specific repository, Rocky Linux is based on CentOS, so you can use the CentOS repository for installation:
dnf check-update; dnf config-manager --add-repo https://download.docker.com/linux/centos/docker-ce.repoWith the repository added, install Docker:
dnf install docker-ce docker-ce-cli containerd.ioAfter the installation is complete, start the Docker daemon and enable it to run at system startup with the following command:
systemctl enable --now dockerInstalling the Runner Container
You can install runners that are either specific to a repository or available to all projects across a workspace.
- For Workspace Runners, go to:
Workspace settings > Workspace runners - For Repository Runners, go to:
Repository settings > Runners
In the Runner installation dialog, under System and architecture, choose either Linux Docker (x86_64) or Linux Docker (arm64), depending on your setup
Use the pre-configured Docker command provided in the Run step of the Runner installation dialog to start the runner. Paste it into the shell but before running slightly modify it:
docker container run -it <strong>-d --restart unless-stopped</strong> -v /tmp:/tmp -v /var/run/docker.sock:/var/run/docker.sock -v /var/lib/docker/containers:/var/lib/docker/containers:ro -e ACCOUNT_UUID={XXXX-XXXX-XXXX-XXXXX-XXXXX} -e REPOSITORY_UUID={XXXX-XXXX-XXXX-XXXXX-XXXXX} -e RUNNER_UUID={XXXX-XXXX-XXXX-XXXXX-XXXXX} -e RUNTIME_PREREQUISITES_ENABLED=true -e OAUTH_CLIENT_ID=XXXXX -e OAUTH_CLIENT_SECRET=XXXXX -e WORKING_DIRECTORY=/tmp --name runner-XXXXX docker-public.packages.atlassian.com/sox/atlassian/bitbucket-pipelines-runnerOptions -d –restart unless-stopped will instruct Docker to auto start the container.
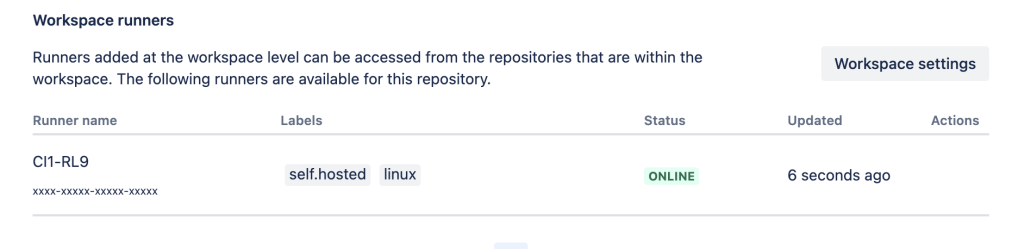
If everything was set up correctly, you should see something like this on the Runners page in your Bitbucket settings:
Update Pipeline to use our runner
The last remaining step is to setup your new runner in your bibelins. Just add the following line in your steps:
....
  default:
    - step:
        name: Run Tests
        runs-on: self.hosted
        caches:
          - composer
....